Coordinated measuring machines were invented as a precision measurement tool, and for a while, they were considered the solution to all measuring needs. As engineering projects became more complex, components of different sizes and scales required measurement. One of the most challenging areas in dimensional metrology has been measuring long, precision tubular items. Until recently, there was no satisfactory solution that ticked all the boxes.
The Problem
The measurement of precision tubular items proved too challenging for a standard CMM. The issue with the  conventional CMM is that critical dimensions cannot easily be verified because the machine is unable to provide reliable data to the software system.
The problem starts with the lack of repeatability. To collect reliable data points, perhaps up to 200mm into an internal bore of a component reveals the immediate problem. No error mapping or compensation can solve this problem. There is no clever software fix. It may be the simplest geometric feature like a bearing diameter requiring size and circularity but if the data delivered to the metrology software is poor then a situation of “rubbish in” and “rubbish out” exists.
The Solution
This rests entirely with the design of the CMM. It is here that a blunt question must be asked. “Is the conventional CMM designed to measure long precision tubular items?
The answer is “No” this type of component is literally “off-limits”. This is not to dismiss the conventional CMM which has a good reputation and does exactly what it is designed for. It identifies the need for a different approach to the old problem of needing to confidently measure down long deep precision bored components. That’s why the Long Bore Measurement (LBM) Machine was designed.
The difficulties for precise measurement of long precision bore items has evolved along with the demands from designers who require greater and greater performance and reliability from their products. Additionally, advances in machining techniques have driven the needs for greater quality control in all areas of metrology.
Precision Measurement for Industry
Long bore measurement is a valuable tool for a range of industries. The main examples are oil, gas, power generation and aviation. In the aviation industry, precision measurement is crucial to ensure safety.
Consider a main jet engine shaft, the exterior and internal bearing diameters along with wall thickness must run concentric to each other around a centreline. If this is not achieved the centrifugal forces generated at extremely high rotation speeds could result in severe vibration difficulties for the engine.
A main jet engine shaft provides many examples for the measurement application of the LBM. Features like hole patterns of PCD’s are required, the measurement of fillet radii where two internal diameters combine or blend. All these features can be measured on the LBM.

LBM the Precision Measurement Solution
In the aviation industry, two important components require precision measurement: engine shafts and undercarriage tubular parts.
Engine shafts became one of the first components that led to the development of LBM products. The first installation in the UK was at a large East Midlands engine manufacturer and has been in regular use for ever since. Other installations include USA suppliers of engines.
The other aviation interest is undercarriage components. The focus is mainly on the hydraulic long tubular components, but recent interest has involved the “A” frame requirements particularly on the larger jets.
As with all components mentioned, the problems of measurement remain largely the same, i.e. to gain access to and then transmit reliable data to the software system involved. Moulded collapsible cores are currently used in some applications.
The internal features of the components, sometimes three metres long, are first moulded with resin then removed from the component. These are then measured conventionally. This method is thought to be challenging particularly when “uncertainties of measurement” are considered.
The LBM Machine
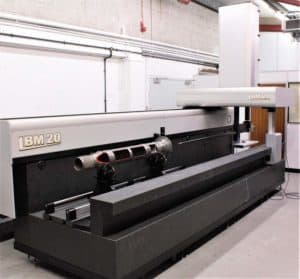
The main bed of the LBM consists of one piece of granite, which is over 4.5 metres long by half a metre thick. Supporting the main X-axis guide is an elevated riser covering the entire length of the X-axis. This is additionally complemented by a support which guides the outside “leg” of the bridge design. The main X-axis guide has a total manufacturing tolerance of 4 microns. These are produced by hand-lapping and are very time consuming to create.
The LBM does not employ any error-mapping, so it must be viewed as a measuring master. This principle follows throughout the construction of the machine, where manufacturing excellence is the greatest importance.
The LBM gains its performance from a unique bridge design. Instead of one Y beam guide, there are two. They offer great stability to the Z-axis which has, in turn, a second stabiliser to control the 3-metre-long carbon fibre measuring lance.
The Future of Precision Measurement
The measuring performance of the LBM is such that it offers a certified capability better than many conventional CMM’s. This is taken at the most extreme measurement point, at the end of the main lance which is equipped with an electronic touch probe.
As a further capability, it is possible to measure not only from the end of the lance but from the first of the two Z-axis, so mimicking a conventional CMM. The performance verification of the LBM is closely aligned to the procedure of ISO 10360/2.
As a supplement to the standard and to reflect the principal of the precision tubular measurement the LBM was designed to perform. A fixture constructed from ring gauge masters is employed. This is used in conjunction with a conventional length step masters, thus providing traceability.
The LBM product can be seen on-site at Eley Metrology in Derby. The facility is employed both for demonstration and subcontract measurement/inspection purposes. The machine on display is the 2000 model. This has a measurement envelope of 2000 x 600 x 600mm.
Smaller LBM machines are now available offering measurement of components up to 1000mm in length. The facilities include as standard the ability to measure as a conventional CMM.
The ground-breaking LBM is now attracting attention from other areas of the marketplace. Oil and gas require problem-solving more accurately with their wellhead components. We can be sure that the LBM has a role in the future of precision measurement.

Jeff Eley is the founder and managing director of Eley Metrology, a leading company in the precision measurement industry. With decades of experience in metrology, Jeff has established himself as a respected figure in the field. Under his leadership, Eley Metrology has become renowned for its expertise in coordinate measuring machines (CMMs), digital height gauges, and granite metrology products. Jeff’s vision has driven the company to develop innovative solutions, including custom-designed CMMs and the flagship long-bore measurement machine (LBM). His commitment to excellence and customer-centric approach has positioned Eley Metrology as a trusted provider of high-precision measurement tools and services for industries such as aerospace, automotive, and manufacturing.

