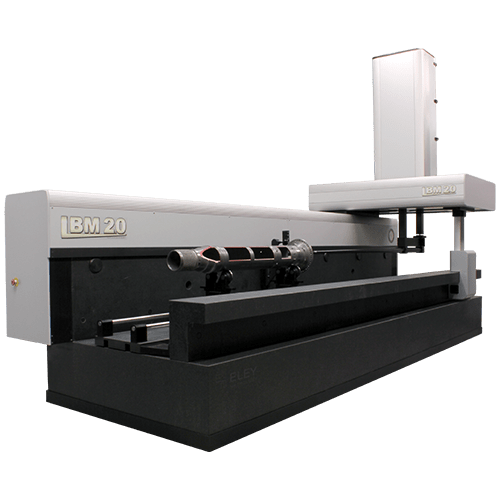
The groundbreaking Long Bore CMM provides a solution to one of the last great challenges in Metrology: offering precision measurement down long or deep bores.
It has been specifically developed for measuring tubular items, for example, jet engine shafts, undercarriage components and power generation plants. This unique machine has applications in multiple industries including oil, defence, automotive and aviation.
Eley Metrology has over forty years of experience offering world-class products and continues to be at the forefront of the UK metrology industry.

Key Features
• The LBM smallest diameter lance can pass through a bore as small as 20 millimetres diameter in order to measure a feature
• The guidance system is that of a Vee-flat configuration and employs patented air-bearings that are pre-loaded throughout
• The LBM is equipped with two Z spindles called Primary and Secondary. They are constructed in a parallelogram providing essential stability to the Z axis of the LBM.
• The LBM can measure from beneath the Primary Z spindle and so can offer convention CMM measurement. The same datum can be used to that of the touch probe at the end of the main lance
• The LBM does not employ any error mapping or computer correction. Volumetric Specification is therefore achieved and supported by a UKAS certificate of calibration
• Precision Straightness and Squareness of machine geometrics are derived from the excellence demanded at the manufacturing stage of the main guides. The X axis guide has a specification of seven microns total and the Y and X axes is produced within two microns total
The LBM in Detail
The LBM is unique and offers a solution to an area of metrology that has always presented a challenge i.e. the precision measurement of features down long deep bores.
The LBM offers unique performance when measuring:
• Concentricity between inner and outer diameters
• Circularity and Cylindricity measurements
• Pitch Circle diameters. – PCD’s
• Fillet radii between diameters
• Straightness and parallelism for component centre line datum
• Partial Arc measurement
With previous old measurement procedures, composite measurement reports were produced employing dial indicators and gauging techniques. Often the budget for uncertainties of measurement alone could often take the component specification outside the available tolerance band. This is why the LBM was conceived. With greater demands for precision by designers along with more superior manufacturing machines, so the need for more accurate and certain measurements had arrived.
Specifications (Written in millimetres and is directly converted to the Inch equivalent by the system)
• Resolves to .5 of a micron. (.0005) m/m / .000019685”
• Volumetric measurement capacity of better than forty microns at the end of a measuring lance of 3.0 metres / 118.11”
• Non-error mapped due to manufacturing excellence
• The specification over the entire length of the X axis guide is seven microns in total, including parallelism and straightness
• The Y and Z axis are within two microns of straightness and parallelism.
• Analysis software: Eley’s True Measure 4 (TM4)
• Direct Inch/Metric Conversion
Note; 1 Micron = .00003937”
Calibration
Eley Metrology carries out further verification employing a system of traceable Master Ring Gauges set in a fixture. Each ring is supported by a Certificate of Calibration of the main Internal Diameter and Concentric External Diameter.
The object of the Master Rings is to replicate the measurement problems created by a precision tube. Therefore, demonstrating the ability to display Diameters, Internal and External and their concentricity’s. In addition to quantifiable examples with respect to all sections of components.
Applications
Applications include aerospace components such as main engine shafts, hydraulically operated under-carriage landing gear, nuclear reactor items, oil industry components, defence systems components and line bored bearing housings and indeed any component where the precision measurement of features inside long deep bores are of interest. Perhaps one of the best examples is highlighted by the critical requirements of a jet engine main shaft.
Such a component will be required to rotate in use possibly at 20,000 rpm. The centrifugal forces involved are immense. It is vital that the geometry and size of such a component are in compliance with the engine designers exacting specifications and requirements.
Concentricity of inner and outer shaft bearing diameters are critical along with the blend radii of various internal and external diameters. All features must be measured in relation to the centreline of the shaft. Any out of tolerance will cause serious vibration problems with possibly catastrophic consequences if not identified before the build of the final engine assembly.
Custom Sizes are Available on Enquiry
The Precision Long Bore CMM is manufactured to customer requirements. As standard, our comprehensive after-sales and support team are always on hand to ensure your LBM is operating correctly.
Find Out More
If you’d like more details about the Long Bore Measurement (LBM), then our team are available to help.
Call Us: 01332 367475
Email: sales@eleymet.com
Send your enquiry via our contact form below;
Subscribe To Our Newsletter
Join our mailing list to receive the latest news and updates from our team.
